No recoil - Macros xml for mice bloody - workshop 8
Content: NO RECOIL-MACROS_PACK-BloodyWorkShop8.zip (2.49 KB)
Uploaded: 23.10.2025
Positive responses: 0
Negative responses: 0
Sold: 1
Refunds: 0
$15.97

Simple No Recoil macros set for removing recoil, consistent vertical-only recoil of weapons in games using Bloody mice supported by the Bloody WorkShop8 program.
If the recoil is inconsistent, the recoil compensation will work approximately up to the 10th shot. After that, the crosshair may start to move up or down.
Do not use these macros in games such as Escape from Tarkov, The Finals, CS2, or RUST.
The video demonstrates the setup process for Razer mice: https://youtu.be/T3AIIWzhPU8. The setup process for Bloody mice is similar; you just need to select the appropriate macro.
Macros for automatic weapons with the .xml extension are only for Bloody WorkShop8.
Macros with the .xml extension also exist for Razer Synapse 3 and 4, but they are not compatible with Bloody WorkShop8.
2. Run the self-extracting archive Macros.exe and click Extract.
If your antivirus reacts, click Allow.
The macros will be extracted into the "Macros" folder located at:
C:\Program Files (x86)\BloodyWorkShop8\BloodyWorkShop8\Accounts\Guest\Data\English\Scripts\Macros
If needed, you can right-click Macros.exe, open it with an archive manager, and manually extract the macros in case of issues with self-extraction.
3. Start the Bloody WorkShop8 program.
v2.1, v2.2.4, v2.2.5
If your aiming mode is held while holding the right mouse button, use macros version:
v2.3, v2.4
When these macros are active, recoil control works while both right and left buttons are pressed.
If the right button is not pressed, the left button functions normally.
v2.1 — Load macros onto mouse button F (7th) if your mouse has it, or onto button 3 (middle click) or side buttons 5 and 4.
After pressing the macro button, recoil reduction will activate.
v2.2.4 — Load macros only onto button 4.
After pressing button 4, the macro activates and recoil control works while holding the left mouse button.
Press button 4 again to disable it and restore normal left-click function.
v2.2.5 — Load macros only onto button 5.
After pressing button 5, the macro activates and recoil control works while holding the left mouse button.
Press button 5 again to disable it.
v2.3 — Load macros onto button F (7th) if available, or onto 3 (middle click), 5, or 4.
After pressing the assigned button, the macro activates and recoil control works while holding both mouse buttons.
Press the same button again to deactivate.
M-...-v2.1 and M-...-v2.4 — Macros with the letter “M” in the name are used when the “Left Click Programming” mode is enabled.
They can be loaded onto the N and 3 buttons located behind the scroll wheel.
If your macro assignment menu includes the option “Execute left button programming” for buttons 5, 4, or 3 (middle click),
you can also assign macros with “M” to those buttons.
When pressing the macro button:
For M-...-v2.1, recoil control works while pressing the left button.
For M-...-v2.4, recoil control works while both right and left buttons are pressed.
To disable the macro, press button 1, located next to button N.
If the recoil is inconsistent, the recoil compensation will work approximately up to the 10th shot. After that, the crosshair may start to move up or down.
Do not use these macros in games such as Escape from Tarkov, The Finals, CS2, or RUST.
The video demonstrates the setup process for Razer mice: https://youtu.be/T3AIIWzhPU8. The setup process for Bloody mice is similar; you just need to select the appropriate macro.
Macros for automatic weapons with the .xml extension are only for Bloody WorkShop8.
Macros with the .xml extension also exist for Razer Synapse 3 and 4, but they are not compatible with Bloody WorkShop8.
INSTALLATION INSTRUCTIONS:
1. Exit the Bloody WorkShop8 program.2. Run the self-extracting archive Macros.exe and click Extract.
If your antivirus reacts, click Allow.
The macros will be extracted into the "Macros" folder located at:
C:\Program Files (x86)\BloodyWorkShop8\BloodyWorkShop8\Accounts\Guest\Data\English\Scripts\Macros
If needed, you can right-click Macros.exe, open it with an archive manager, and manually extract the macros in case of issues with self-extraction.
3. Start the Bloody WorkShop8 program.
MACRO VERSIONS:
If your in-game aiming mode switches with a single right-click, use macros version:v2.1, v2.2.4, v2.2.5
If your aiming mode is held while holding the right mouse button, use macros version:
v2.3, v2.4
When these macros are active, recoil control works while both right and left buttons are pressed.
If the right button is not pressed, the left button functions normally.
v2.1 — Load macros onto mouse button F (7th) if your mouse has it, or onto button 3 (middle click) or side buttons 5 and 4.
After pressing the macro button, recoil reduction will activate.
v2.2.4 — Load macros only onto button 4.
After pressing button 4, the macro activates and recoil control works while holding the left mouse button.
Press button 4 again to disable it and restore normal left-click function.
v2.2.5 — Load macros only onto button 5.
After pressing button 5, the macro activates and recoil control works while holding the left mouse button.
Press button 5 again to disable it.
v2.3 — Load macros onto button F (7th) if available, or onto 3 (middle click), 5, or 4.
After pressing the assigned button, the macro activates and recoil control works while holding both mouse buttons.
Press the same button again to deactivate.
M-...-v2.1 and M-...-v2.4 — Macros with the letter “M” in the name are used when the “Left Click Programming” mode is enabled.
They can be loaded onto the N and 3 buttons located behind the scroll wheel.
If your macro assignment menu includes the option “Execute left button programming” for buttons 5, 4, or 3 (middle click),
you can also assign macros with “M” to those buttons.
When pressing the macro button:
For M-...-v2.1, recoil control works while pressing the left button.
For M-...-v2.4, recoil control works while both right and left buttons are pressed.
To disable the macro, press button 1, located next to button N.
FINDING THE RIGHT MACRO:
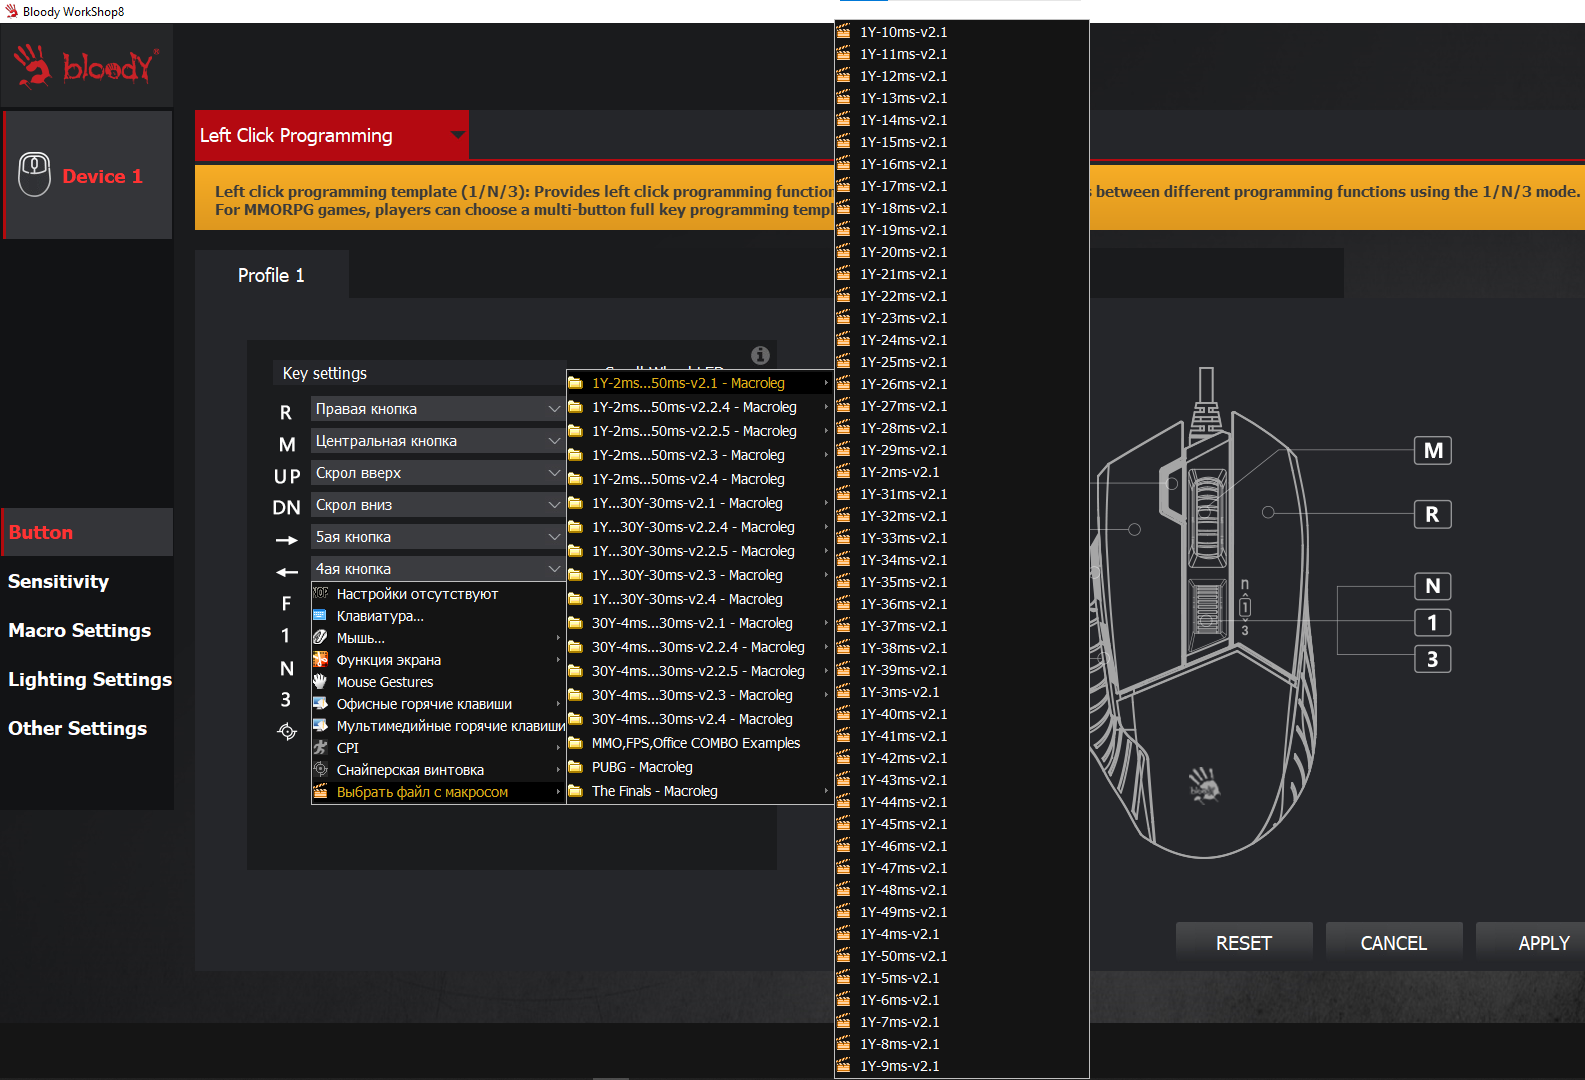
If, while using 1Y-15ms, the crosshair moves upward — try 1Y-10ms.If with 1Y-10ms the crosshair moves downward — test values between 1Y-11ms and 1Y-14ms.
Focus on the first 10 shots; fire at a wall to check grouping. In most games, the recoil pattern is most stable during the first 10 shots. If bullets hit close to each other, the macro is well-tuned.
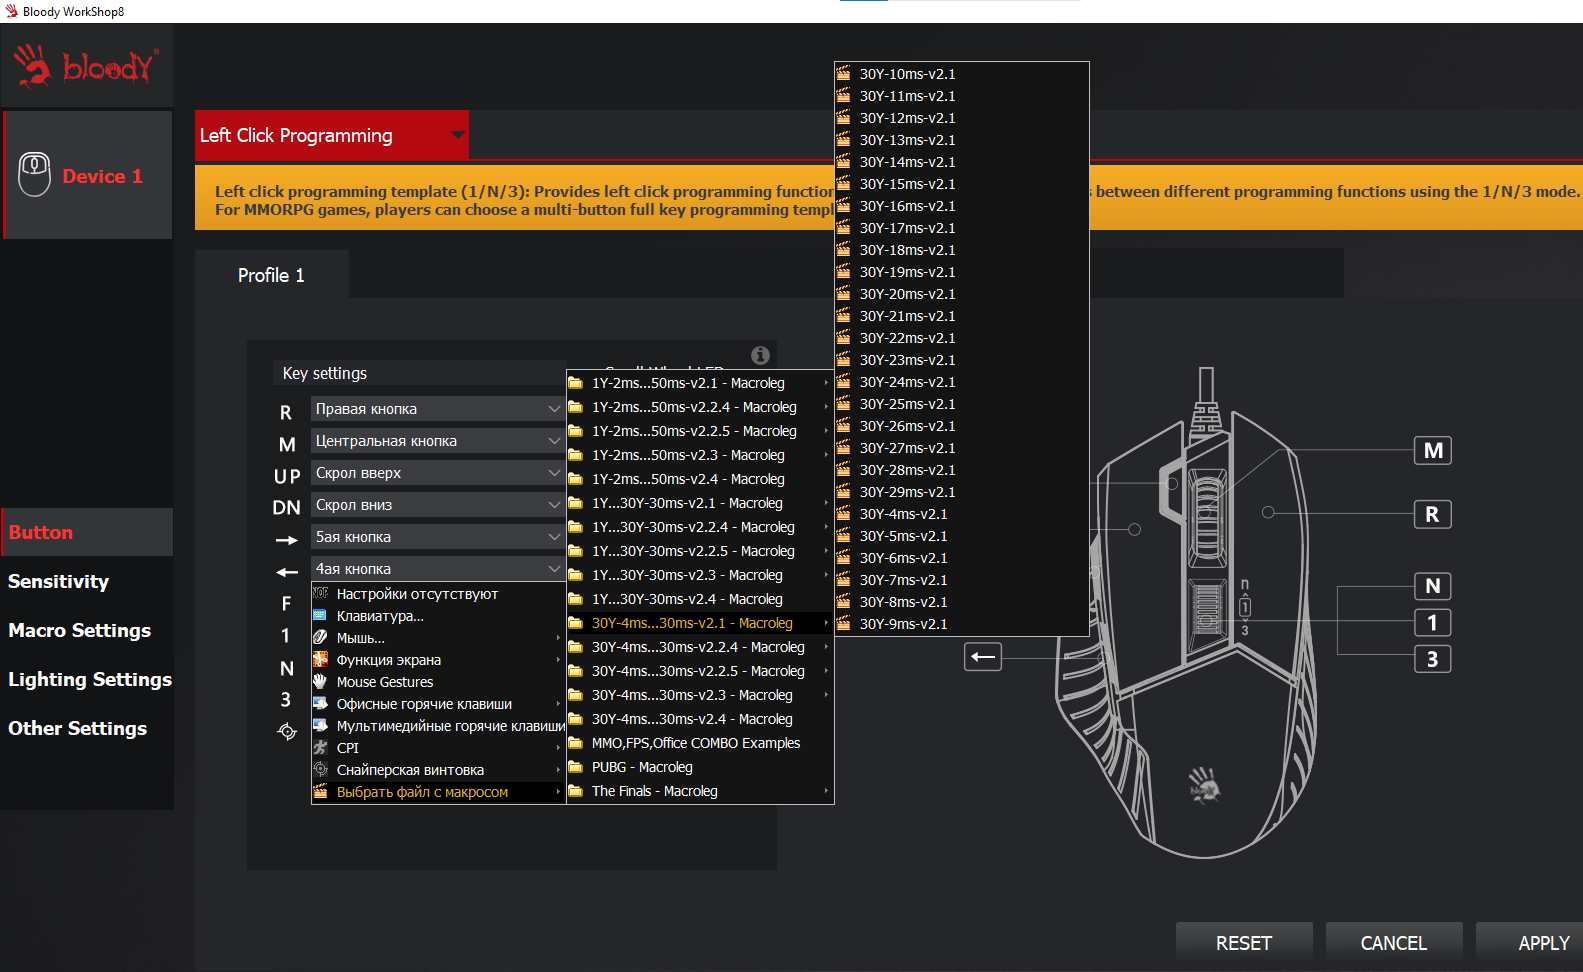
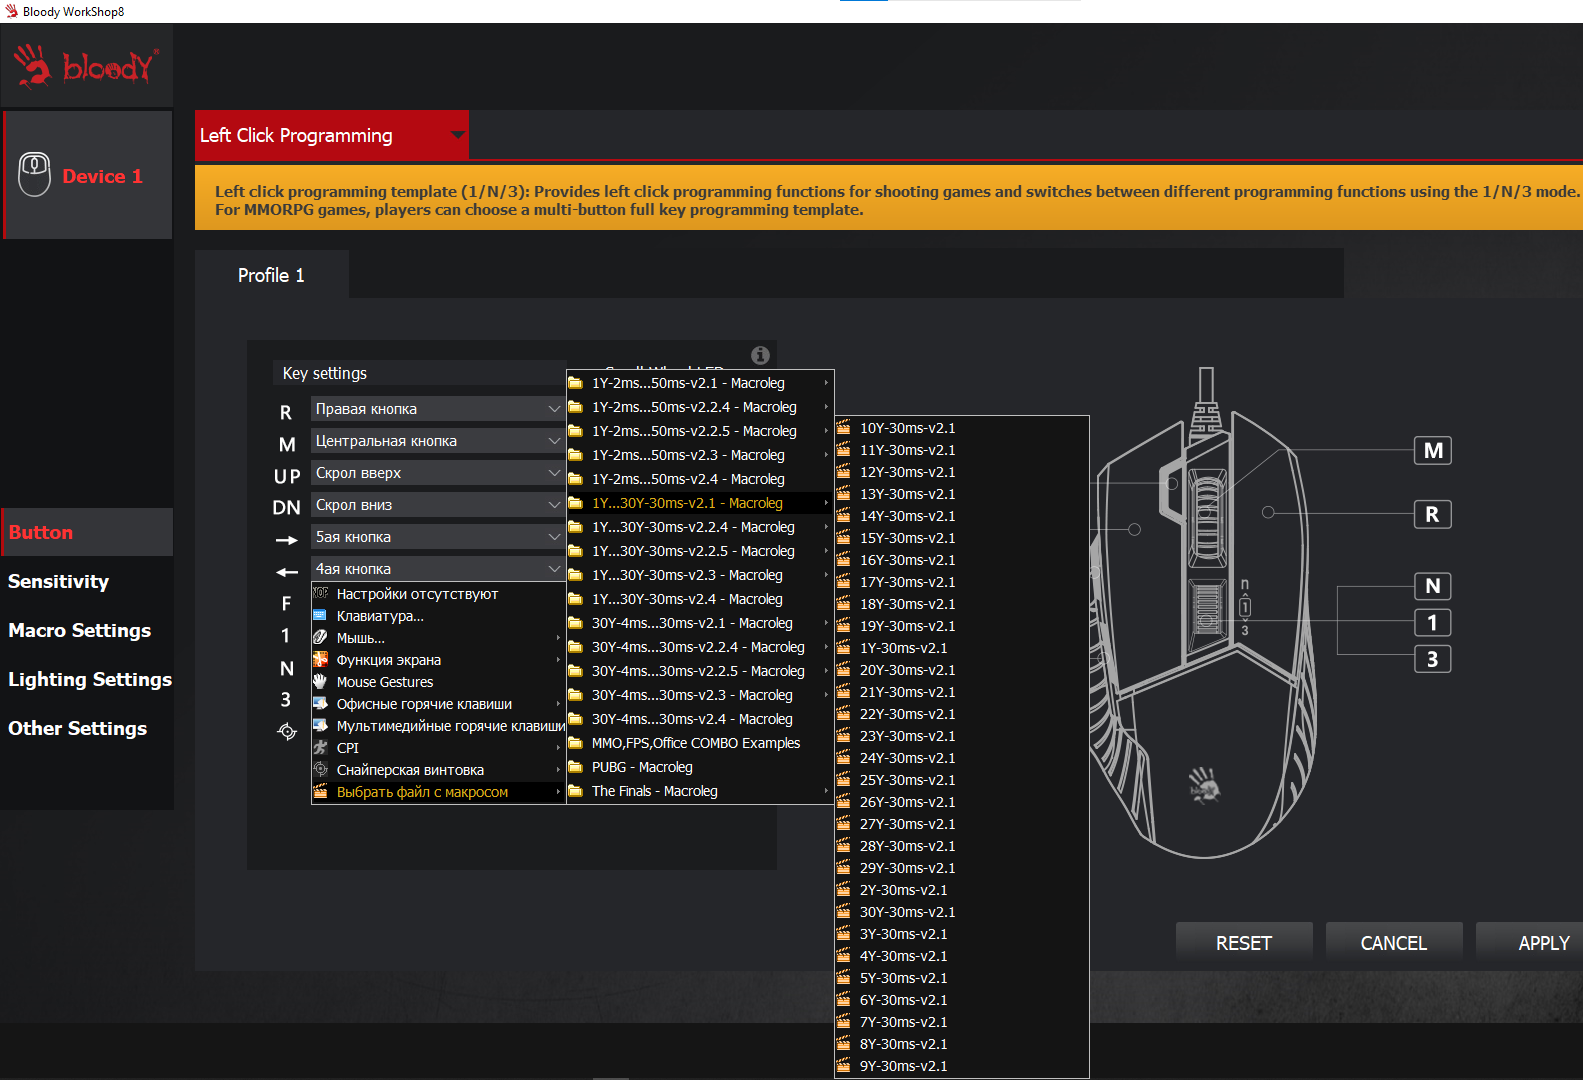
If using 1Y-2ms causes the crosshair to move upward, try macros from the 1Y...30Y-30ms folder.
If using 30Y-30ms makes it move upward, try macros from 30Y-4ms...30ms.
If 1Y-30ms causes downward drift, try macros from 1Y-2ms...50ms.
IF YOU HAVEN´T FOUND THE RIGHT MACRO ON SALE. THEN I CAN MAKE YOU A MACRO FOR A CERTAIN PAYMENT.
Attention!!! If you can´t pay with a bank card. Then you need Litecoin and get it easy:
1. Sign up for Payeer: https://payeer.com/?session=13084023
2. Register with the European Exchanger: https://changer4u.com/ru/aff/e60c9d86e365ae81439dedefa2ad227e3ac569d6
3. Replenish Payeer with an exchanger.
4. In Payeer replenish Litecoin.
5. When buying, choose Litecoin from the payment methods.
When paying with Litecoin, there is no banking commission and the price of the item is lower.
You can also pay with skins from Steam: zen.yandex.ru/video/watch/65c05a87bf878653f5ccff1d
After payment you will receive a link to download the archive with macros. If you accidentally closed the page with this link, you can return it by clicking on the link in the letter that came to your e-mail after payment. You can also go to your personal account at oplata.info and your purchase will be displayed there.
No feedback yet